Saturday 2 August 2014

Review | Chi Chi Bronzes Eyeshadow Palette


I've had my eye on the highly raved about naked palettes for quite sometime now but, the cheapskate in me can't seem to bring itself to pay over 50 bucks for an eyeshadow palette. I know what you're thinking; seriously Jane it's really not that much given you get 12 beautiful and high quality shades, but...ehhh! But after looking for adequate dupes I stumbled across one recommended by youtube beauty guru, Shaaanxo who gave her approval of the much cheaper Chi Chi eyeshadow palettes. So I took it upon myself to try out the Chi Chi Bronzes palette and I must say.. im impressed!

The Chi Chi palettes come in a few different variations but the Bronzes palette really stood out to me, and for anyone else with blue eyes I really recommend you try it out as well, the warm and reddish hues really makes your eyes pop! The palette set me back about $14 on sale from around $20, which is not too shabby if i do say so myself! All twelve shades are really pigmented and I didn't experience any fall out, which is a plus! Although I am prone to the old oily eyelid situation, and if you are too, then I would suggest wearing some sort of primer underneath as I did find by the end of the day the colour had begun to slip away!

 Although it probably wouldn't be as fabulous as the Urban Decay naked palettes, I still give this palette a big thumbs up! 

Monday 14 July 2014

Style Inspiration | Layers


My life looks very different now compared to when I started this blog. Over the past couple of months I have gotten a new job in the city, which has been a bit of lifestyle change going from a little too much time on my hands to wondering when my next day off will be! Not to mention that I have lived my whole life in a small country town so spending my days constantly surrounded by people has taken a little getting used to! I have also have been busily organising my travels to Europe next month which i honestly cannot decide whether I am completely terrified or completely excited, so it's probably safe to say that I am a happy medium of both! None the less I have completely neglected my poor little blog, but since work is getting a little quieter I finally have some time to get back into the swing of things!
Pinterest is a platform that I love going to, as I can always count on finding endless amounts of inspiration. (I seriously think everyone should have a pinterest account!) Whenever i'm stuck in a fashion rut I just scroll through the hundreds of outfits which help remind me about similar things that are in my wardrobe so i can recreate a killer look like the one I saw on pinterest! (Not to mention the DIYs... I could literally scroll through them for days!!) 
So I thought what better way to get back on my blogging feet then to compile some inspiring outfits that I found on pinterest!  Recently I have been loving layering pieces because not only does it provide warmth, which is an essential during this horrible winter weather, it also adds so much interest and dimension to an outfit! Even style queen Alexa Chung cannot get enough of layering, admitting " My style is absolutely based on layering. When I can't do that, I don't understand what I'm going to do."

BTW you can find my pinterest account here...so feel free to follow if you like! *shameless plug*

Monday 2 June 2014

Top Ebay Picks | No. 2


Here is another (and well overdue at that) collection of fashion bits and pieces that I found on Ebay. These 
bargainous items are both super cool and perfect for the chilly winter months! 

1. Monochrome chunky boots buy here
2.  Black top with caged sleeves buy here
3. Neoprene floral mini skirt buy here
4. Disco pants buy here
5. Cleated heels buy here
6. Felt fedora hat buy here
7. Joy division iphone case buy here
8. Grey fluffy jacket buy here
9. Black coat buy here

Friday 23 May 2014

Review | Crest 3D advanced Professional Effects Whitening Strips


I  have wanted to whiten my teeth for quite some time as I've always felt that my teeth were slightly discoloured and much more 'yellow' compared to other peoples teeth. I had tried whitening toothpastes and even had a go at the whole DIY teeth whitening paste using bicarb soda and lemon, but never really noticed much of a difference. I've never had braces and even though my teeth are in no means particularly crooked, in a world where pretty much everyone these days has perfectly straight teeth, I thought whitening my teeth would be a great confidence boost and a way to make me feel good about my gnashes.

With not much on the Australian market in terms of teeth whitening products and not really having much of a clue as to what brand I should go for, I did what most people do and turned to the internet to figure out what would be the best product for me. The overwhelming consensus seemed to be that the Crest whitening strips is the top dog as far as at home whitening treatments go, and after reading up on a few good reviews I was up for giving it a go. Because Australia does not stock Crest products being an American brand, I had to order mine online. I bought my crest strips from crestwhitestripsaustralia.com, which I highly recomend as an authentic seller, that provides excellent service, fast shipping ( I received mine after about 3 days) and the pricing is really reasonable (I paid around $70). It is really important that you buy Crest products from a reputable seller as there are so many fakes that are sold online, so you have to be particularly careful on sites like ebay.

There are quite a few different varieties of crest whitestrips to chose from, so deciding on which to go for can be kinda confusing. The strips differ in strength and the length of the treatment, which give results accordingly. Naturally I wanted the the best results for the best value and was tossing up between the Professional Effects and the Advanced Vivid Effects strips, but I found good reviews on both and didn't really know the difference between the two. Finally I found THIS blog post which cleared up all my questions and suggest that you guys read too if you're considering using Crest stips, it's really detailed! Basically they are the exact same thing but because you get 6 more treatments in the Professional effects kit you get whiter results at the end the treatment, however if the Advanced Vivid kit came with the same amount of treatments you would get the same results...if that makes any sense?

The Professional effects is a 20 day treatment that comes with 20 upper and 20 lower strips. To apply the stips, stick the adhesive side which has the whitening bleach to your teeth and fold over the excess to the back of your teeth. Leave the strips on for 30 mins and simply peel them off. I personally didn't experience any sensitivity/ pain at all (which says a lot considering I have weak enamel) however if you do, you can just skip a day or so to let your teeth recover. I was also pleasantly surprised to find that they didn't leave any unpleasant taste in my mouth whatsoever! Everything about these strips tick my boxes and even though I was a bit skeptical at first, I am super impressed with the results! But I'll let you guys be the judge of my new pearly whites...

Wednesday 14 May 2014

DIY | Easy Ripped knee Jeans


Distressed jeans have always been in fashion, however recently I have seen the 'ripped-at-the-knee' jean trend everywhere! It is the perfect transition piece for the cooler autumn months which creates an effortless look with a grungy edge. I had an old pair of black jeans lying around that I got from Big W for around $15 so I thought I would have a go at distressing them myself. I am really happy with the end results and I think everyone should give this a go if you have a pair of jeans that you never wear or even if you go to an op shop and pick up some really cheap jeans, you can diy them and achieve the exact same results as ripped jeans bought in store for a fraction of the price! This is a fun little project that literally takes 5 minutes to do and is sooo easy, so what are you waiting for?


||STEP 1||
Firstly you will need to try on your jeans and using the chalk mark out where you want the rips to go. I used a light coloured chalk because it is really easy to see on the black denim, draws on well and can easily wash out if you make a mistake. However if you don't have any chalk handy you could use a fabric pencil or marker. Where you choose to make the rips is completely up to you, but I found making my rips mid-knee worked really well to achieve the ripped knee look.

||STEP 2||
 Next take off your jeans, and if you used chalk be careful when removing them so you don't smudge your marks. Then pinch up the fabric where you want to make your rips making sure that the front and back sides of the jeans are separate so you don't end up cutting a hole on both sides of the jeans. Make a small snip where you have made the mark. I used scissors that were slightly blunt rather than sharp scissors to avoid a super clean and perfectly straight cut.

||STEP 3||
 Once you have made the first incision you can slide your scissors in the hole to follow the mark you made. My rips ended about 1.5-2 cms from the side seams.

||STEP 4||
In order to distress the rips you have just made, pull and tug at the loose threads around the edges of the rips. You can also use the scissors to make tiny snips around the edges or use the small bumpy side of a grater and grate around the rips to further distress the jeans or if you find that your cuts ended up too clean. However I found just using my fingers worked fine.

||STEP 5||
 Next I put the jeans back on and bent my knees to rip the slits even more, over time the rips may open up more and become more distressed, but it's all good as a little wear and tear is all a part of the look! Finally put them through the washing machine to get rid of any chalk marks that might still be on the jeans and this also helps to fray the rips even more.

||FINISHED||

  Good Luck 
xx 

Sunday 4 May 2014

Review | Revlon Matte Balms


L-R: Unapologetic, Audacious


The Revlon ColorBurst matte balms and lacquer balms have been on the shelves for a couple of months now, so yes I know, I'm a little late on the band wagon but to be fair every time I went looking for them all of the shades were completely sold out! So it was happy days when I finally got my hands on these two gorgeous matte shades in 'Audacious' and 'Unapologetic'. I didn't really bother with the lacquer balms because I not a big fan of glossy lips so I thought I would just give them a miss.

If you don't know what they are ( firstly have you been living under a rock?) they are a the two new additions to the ColorBurst range, similar to the ever so popular Kissable  Balm Stains. The matte balms have the same creamy formula, yet has a matte finish and is much more opaque then the Balm Stains. They also have the same minty scent and a slight tingling feeling when first applied to the lips. The packaging resembles a crayon stick with a tapered nib, which allows for precise application and also has a retractable bottom that screws up more product when needed. 

Overall these matte balms are absolute winners for me, the colour pay off is excellent and are pretty true to colour however 'Unapologetic' is a true bright pink yet looks it would be slightly more coral on the packaging. The longevity is also really good lasting about 4 hours before it begins to fade. I also love the fact that it doesn't sit the cracks of my lips, and being a matte finish, I would say that's pretty damn good! Although the formula of these balms aren't as matte as some of my other matte lipsticks, it stays smooth and velvety on the lip for a lot longer and doesn't dry them out either. I would highly recommend this lip product if your a matte lip lover like me, as I think they are the perfect addition to every lipstick collection and they come in nine different shades so I'm sure there will be at least one to suit everyone!

Thursday 24 April 2014

Trends | A/W 2014

Say good bye to the typical dark and dreary hues this winter, as it it is time to embrace the winter pastels trend. I love how this trend breaks all the rules of the traditional winter colour palette. I think it's a fun way to brighten up those chilly days whilst still remaining warm and cosy. Who ever said pastels were only reserved for spring anyway?
1. Mint fluffy shawl - River Isalnd
2. Pastel yellow clutch - ASOS
3. Mint turtle neck jumper - Portmans
4. Mint pants - ASOS
5. Pink coat - Target
6. Floral pastel platform shoes - ASOS
7. Light blue jumper - Target
8.  Pastel neoprene jacket and skirt - ASOS
9. Pastel pink jeans - Topshop
Different textures always make their way in to current trends and this Autumn/ Winter it's all about the quilted look. I am starting to see quilted clothing hitting the shelves in a lot of high street stores, which is great news as I love the chunky texture it adds.
1. Grey quilt jumper - ASOS
2. Pattered quilt jumper - Target
3. Boots - River Island
4. Bomber jacket - Target
5. Leather top - ASOS
6. Grey Quilt skirt - ASOS
7. Slip on shoes - ASOS
8. Neon Green jumper - Topshop
9. Embroidered quilt jumper - ASOS
Tartan is a pattern that is so classic and will probably never go out of style. However this year in particular it has become a big trend for the colder months. And because of it's versatility and endless style you can afford to invest in some great tartan pieces and not have to worry about it going out of fashion. Tartan comes in many variations of colours and styles so there is something out there to suit everyone's wardrobe.
1.Tartan dress - Missguided
2. Jumper - Target
3. Wrap skirt - Topshop
4. Peter pan collared crop top  - Target
5. Skit with mesh insert  - Missguided
6. Grey tartan dress - ASOS
7. Overalls - ASOS
8. Satchel - ASOS
9. Coat - ASOS

Sunday 13 April 2014

H&M Australia | Melbourne GPO Opening + Mini Haul

Pictures: David Caird. Source: News Limited
At the beginning of this month, Australia's very first H&M store opened it's doors in the city of Melbourne. The store takes up the whole of Melbourne's GPO building, so as you can Imagine, It's HUGE, and I'm talkin' 3 stories huge! I spent about an hour and a half in there and didn't even see everything! None the less this is great news as it means we get everything H&M has to offer, instead of lucking out and getting the off cuts from overseas (I'm looking at you Zara!). Although I don't really have any other H&M's to compare it to, it seems our Aussie H&M lives up to the name of providing highly fashionable pieces at very low prices!

As with all new stores, can you expect to see a line to get in for the first few days, but  it has now been a little over a week since  it opened and the line for H&M still extends right round the store! I went  two days after it opened and had to queue up for about half an hour, although the line was always moving so it wasn't too bad. However, when I first arrived I took one look at how many people were lining up to get in and contemplated just leaving, but my curiosity to see what was inside was just too strong, so I sucked it up and joined the queue.  

The Interior of the store is very impressive! It's so clean, white and pristine, with the random tree here or there. To me it's almost like shopping in a really high end store but with low prices, so it's the best of both worlds! Although with the amount traffic flowing through the store all day, it was a mess! The racks were really untidy, things were out of place and just shoved anywhere as soon as someone decided that they didn't want them any more! And if you thought you had done your time lining up outside, then think again, because the line for the changing rooms was only slightly better! 

All in all, I highly rate H&M and can see great potential for more stores opening up nation wide. I just can't wait for the day when the craziness has died down and you no longer have to line up to get in, because a) I really want to go back and b) Ain't nobody got time for that!

MINI HAUL

Black turtle neck jumper - $19.95
Caramel knit jumper - $27.95
Black cami singlet - $39.95
Over the knee socks - $9.95

Wednesday 9 April 2014

Collective Haul | Feat. Target, Sportsgirl, Rubi, Supre, Opp Shop...

Today I'm coming at you with another haul, even though like I said in my last beauty haul,I need to stop with the spending and start with the saving  (I clearly have no self control) *slaps wrist*. 
Aside from that I thought I would show you some of the things that I have recently picked up, just in case you were interested!
Quilted bomber jacket ,white top ,grey quilted top & tartan jeans - Target
New Balance Runners -  Rebel Sports
I don't know if any of you have been to Target recently, but I feel like over the past couple of years they have really stepped up their game! I am loving the new season of clothing that they have brought out, which has left me very pleasantly surprised. It's great that Target is putting in more of an effort to catch on with the season's trends and I found my self wanting to buy a lot more pieces instead of the usual one off gem.
It was also about time I upgraded my 4 year old runners, which desperately needed  to be chucked out! So I picked up these funky New Balance purple runners that have neon green soles and details which are super comfy and I absolutely love!
Green pencil skirt & black top- Sports girl
White top - Supre
Pink sandals & black sandals - Rubi Shoes
Revlon matte balms - Target
I've had a $50 gift voucher for Sportsgirl that has been burning a hole in purse for a while now, so I was happy to finally spend it on this absolutely gorgeous green tropical print midi skirt. I also picked up a couple basic tops, one from Sportsgirl, and a white one from Supre that has rather large slits up either side which reminded me of a tee from the brand Cheap Monday that's of a similar style. 
As summer has come to an end, Rubi shoes is having a great sale on all of their sandals, so naturally I made the most of it and purchased two really cute pairs at $15 each.
I also finally got my hands on a couple Revlon matte balms in 'audacious' and 'unapologetic', which you can expect a blog post about them in the near future!
Bags -  St Vinnies (Op shop)
I have been on the hunt for the perfect vintage op shop handbag, after seeing so many people who have been able to nab really cute and original bags from op shops. I scowered so many op shops and have been really unsuccessful, but the other day when I went into a St Vinnies with high hopes I finally struck gold! Both bags are in perfect condition, aside from the slight unpleasant whiff of mothballs, so if anyone know how to get rid of the smell of mothballs let me know! I bought the navy blue bag on the left for $7 and the smaller bag for $4, talk about bargain!!F

Monday 31 March 2014

Beauty Haul | No. 1


A couple of  weeks ago I had a teeny splurge on beauty, and because Priceline was having a 40% sale on all cosmetics I just couldn't resist! I know it may not seem like I bought too many things, but this was all in a days work and I really should be saving, so yeah...naughty me!


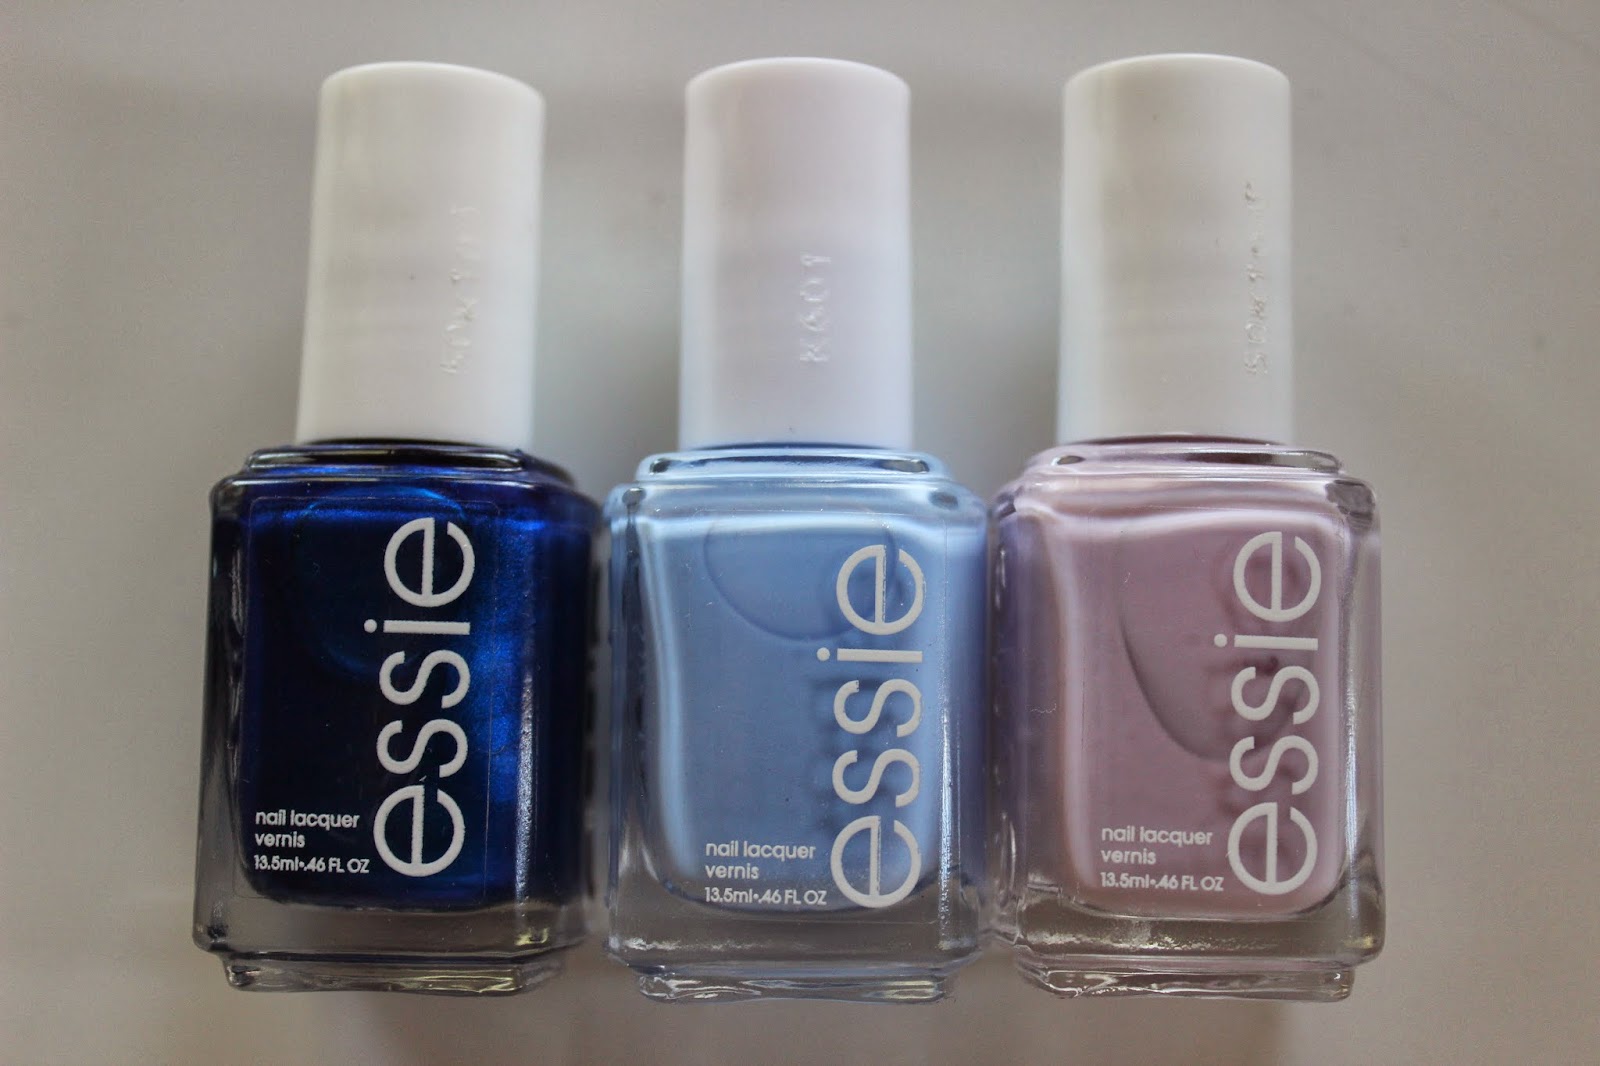
 Essie is a brand that I would consider to be on the more pricier side of the spectrum of drugstore nail polishes, being priced at around $17 a pop, so I made the most of the 40% off deal and picked up three in the shades 'aruba blue' a metallic, mid toned blue, 'bikini so teeni' a powder blue with tinnnnny specks of glitter in it, and 'go ginza' which is a very pale lilac. 
I would highly recommend Essie polishes as they are very opaque and need just 2 coats to reach their full colour, and are very high quality, staying chip free for about 4-5 days without a topcoat. 
The only problem I have is that the brush is pretty small and doesn't cover much of the nail when applying. As a result it makes it a bit harder to apply and looks quite streaky when its first applied but it surprisingly dries completely smooth and seamless! 

SWATCHES...
(Left to Right) Go Ginza | Binkini so teeni | Aruba Blue 

Topshop 'Pillow Talk'  
I have read so many good things about Topshop makeup, so when I was in the Chapel st store I thought it was the perfect opportunity to pick up a couple things to try out for myself. I must say, so far I'm pretty impressed with the quality of this lipstick, it very pigmented and moisturising on the lips, however I found that if you have chapped lips it tends to sit in the cracks which is pretty annoying, but forgivable. Aside from that the colour is a gorgeous pale pink, but was a fair bit paler then what I expected when I first applied it to my lips! None the less it is still a pretty shade. The Topshop lipsticks are a reasonable $15, given their high quality and great colour pay off. Not to mention the undeniably cute packaging which I absolutely love!

Chi Chi 'Say My Name'
I'm still not too sure why I bought this lipstick. Was it because of how well other people can pull of ultra pale lilac lipstick? Or was it because it is called 'Say My Name' which reminds me of  a quote off Breaking Bad, a tv show that I love so dearly? Well I dunno, but it certainly isn't the shade that I would normally reach for! None the less I will try to find somewhere to wear it, even if it's just for a fancy dress party!
 The formula of this lipstick is very matte and doesn't seem to dry out the lips too much, but with most matte lipsticks I would recommend wearing a lip balm underneath to retain a bit of moisture. The smell of this lipstick is probably my favourite part! I don't really know how to describe it but it is so nice and almost smells like a fragrance that you actually want to wear! The packaging I find a bit tacky, but I'm not really too fussed by packaging anyway (apart from Topshop packaging of course) so I'll deal with it. I can't remember the exact price of this lipstick but I think it was around the $10 mark.

Revlon Kissable Balmstain in 'Honey'
Originally I was looking for the new Revlon matte balms after being convinced by many beauty bloggers that it was something that I desperately needed in my life, but after trying to find them at numerous stores, I soon realised that they were completely sold out! (To be honest I'm shocked that people are so on to it!) Instead I thought I would try out the original balm stains, opting for the colour 'honey', as it looked like a nice subtle pinky shade. And I must say, I am surprised by how much I love this! I was a bit sceptical as I don't usually like lip products to be too glossy but this has a kind of subtle sheen when first applied then dries to stain. It is perfect for everyday use and you don't have to worry about  it smudging everywhere when eating which is always good! I would defiantly recommend everyone try this! 

Chi Chi Matte Lipstick -Say My Name | Topshop lipstick - Pillow Talk | Revlon Just Bitten kissable Lipstain- Honey
Topshop Glow in 'Polished'
I have never actually owned  highlighter before, so this is pretty new to me. When browsing through the Topshop makeup I noticed how pretty their highlighters looked so I took it upon myself to give it go and try out the Topshop glow highlighter in 'polished'. I would describe this shade as quite pearlescent, being a shimmery white/silver with glimmers of pink running through. The Topshop highlighters are, I think, a bit on the pricey side being $18 each, and although they are brilliant quality, I still don't know whether it was really worth it. I apply the product to the tops of my cheek bones and the inner corners of my eyes, which gives a nice over all glow to the face. When applying, keep in mind that a little goes a long way as you really don't need much, so I can tell that this is going to last me ages, which is good news because it is a fairly small amount of product!

 SWATCHES...
(Left to right) Revlon Just Bitten kissable lipstain - Honey | Topshop lipstick -Pillow Talk | Chi Chi matte lipstick - Say My Name | Topshop Glow -Polished
NYX Eyebrow Cake Powder in 'Blonde'
I have been using an eyebrow pencil by Rimmel in the shade 'Hazel', but I wanted to try something else as I find it has too much of an orangey tone to it. So I decided to try out NYX's Eyebrow Cake Powder in 'Blonde' after seeing a few good reviews. So far i'm really liking it! it includes two pressed powders in light brown shades that are supposedly suitable for blondes,but suites my mousey brown hair just fine, as well as a wax and a little spooly and angled eyebrow brush. I use the darker powder as I find the lighter powder is just too light so I tend not to use it at all, and begin by applying the powder with the angled brush in short stroking motions to fill in the brows. I then I apply the wax with the spooly, brushing through my brows to hold the shape in place, which I think also helps it look neater and darkens up the colour slightly. I think this eyebrow powder is so affordable being priced at around $10, so you don't have to break the bank to achieve great brows!